BLOCK Diagram For Whole Project:
Simple Bloack Diagram of Our Line Follow Robot

IR Sensor Circuit Diagram
Bread Board :
 Read This For Understand The Sensor Circuit .
https://circuitdigest.com/electronic-circuits/ir-sensor-circuit-diagram
Same Circuit in PCB (Our Goal).
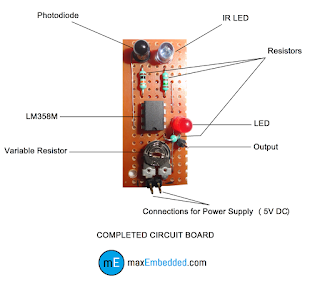 Bottom of this Link You can Find The same Circuit in PCB .
http://maxembedded.com/2013/08/how-to-build-an-ir-sensor/
OR
You Can Buy It Ready mate for this link in bangladesh .
We Need 3 Unit of this sensor

http://bdspeedytech.com/index.php?route=product/product&product_id=238
Code and Connection to Ardiuno
Sensor In Car Module :
connect the sensor bottom of the car .

Sensor and Arduno: sensor connection with ardiuno .
 Code
Code
Code Link :(Read this Link Very Care Fully )
https://create.arduino.cc/projecthub/16336/line-follower-robot-using-arduino-5f5698
Wright Down the Component make a list which you need to buy and Test the IR Circuit First .
Simple Bloack Diagram of Our Line Follow Robot

IR Sensor Circuit Diagram
Bread Board :

https://circuitdigest.com/electronic-circuits/ir-sensor-circuit-diagram
Same Circuit in PCB (Our Goal).

http://maxembedded.com/2013/08/how-to-build-an-ir-sensor/
OR
You Can Buy It Ready mate for this link in bangladesh .
We Need 3 Unit of this sensor

http://bdspeedytech.com/index.php?route=product/product&product_id=238
Sensor In Car Module :
connect the sensor bottom of the car .

Sensor and Arduno: sensor connection with ardiuno .

Code Link :(Read this Link Very Care Fully )
https://create.arduino.cc/projecthub/16336/line-follower-robot-using-arduino-5f5698
Wright Down the Component make a list which you need to buy and Test the IR Circuit First .
No comments:
Post a Comment